Graphics State
The graphics state stores your current color and transformation settings. You could think of it as painting. When painting, you can hold one type of brush and put one color of paint on it. All the lines you then paint on the canvas have the same color. And the same texture according to the thickness and softness of the brush. Naturally, you could paint with both hands and feet holding multiple brushes with multiple colors. But then things become chaotic.
So in NodeBox you "paint" with one color. All of the elements you draw have the same color, until you switch to a different color. Then all subsequent elements you draw have that color.
State commands
When you run a script, NodeBox reads the code from top to bottom, like a recipe. When it encounters certain commands, it changes the current state. All subsequent elements (primitives, paths, text and images) you draw then adhere to the current state.
Color commands that change the state:
colormode(), fill(), stroke(), strokewidth(), nofill(), nostroke()
Transformation commands that change the state:
transform(), translate(), rotate(), scale(), skew()
Text commands that change the state:
font(), fontsize()
For example, observe the following script. We start by setting the current fill to red and draw three red ovals. Then we set the current stroke to black and change the fill color to transparent and draw two ovals with a black outline and a transparent fill:
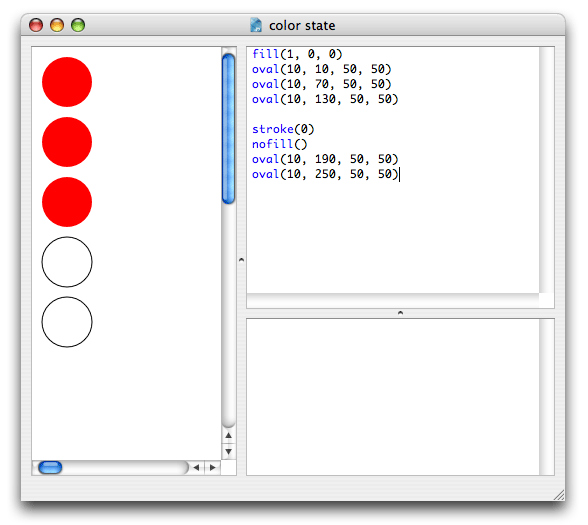
By default, the current fill color is black. The default strokewidth is 1. However, stroke colors won't show until you define a current stroke color, which is transparent by default.
Transformation state
You can think of the transformation state along the same lines as when painting. The NodeBox drawing canvas has an origin point at the top left corner (horizontal x=0 and vertical y=0). The translate() command lifts up the brush and puts it somewhere else. It changes the origin point.
When you say:
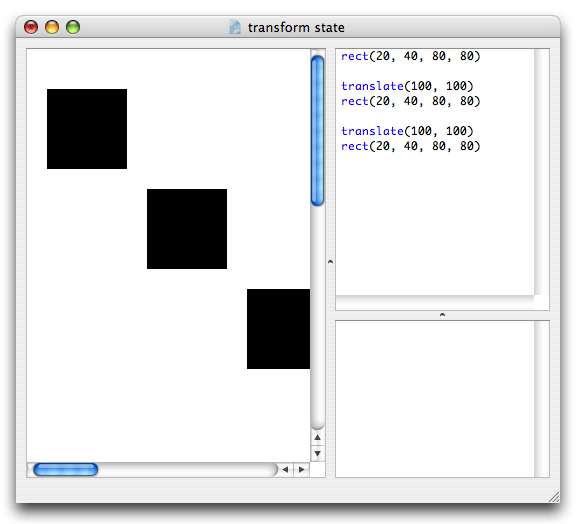
rect(20, 40, 80, 80)
a rectangle with a width and a height of 80 will be positioned 20 to the right and 40 down from the top left corner of the canvas.
But when you say:
translate(100, 100)
rect(20, 40, 80, 80)
the origin point is no longer at the top left (x=0 and y=0). We translated it to x=100 and y=100. So the rectangle will be drawn 20 to the right and 40 down of the new origin point. The rectangle ends up at x=120 and y=140. The translate() command displaces the current origin point relative to the previous origin point.
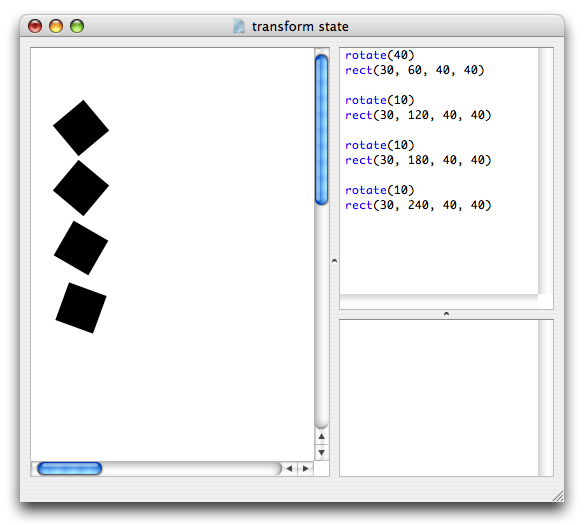
Rotation, scaling and skewing work incremental as well. If you first rotate by 40 degrees, all the elements you subsequently draw will be rotated by 40 degrees. If you then rotate by 30 degrees, the current rotation becomes 70 (40 + 30). All subsequent elements will be rotated by 70 degrees.
Likewise, if you keep putting scale(0.8) in your script the elements on the canvas become smaller and smaller. The second time you scale, the current scale becomes 0.64 (0.8 x 0.8), the third time it becomes 0.512 (0.64 x 0.8) and so on.
Corner mode transformations
We haven't discussed the transform() command yet. As you may have already read in the reference you can switch it between CENTER and CORNER. Centered transformation means that all shapes, paths, text and images rotate scale and skew around their own center. As we would probably expect them to. Corner mode transformations means that elements transform around the current origin point. This can be a difficult concept to grasp.
Take a look at stars and planets. The sun is a star in space and our Earth orbits around it. You could think of the sun as the current origin point on the canvas (remember that this is not necessarily the top left) and the Earth as an oval that is rotating around it using a corner mode transform.
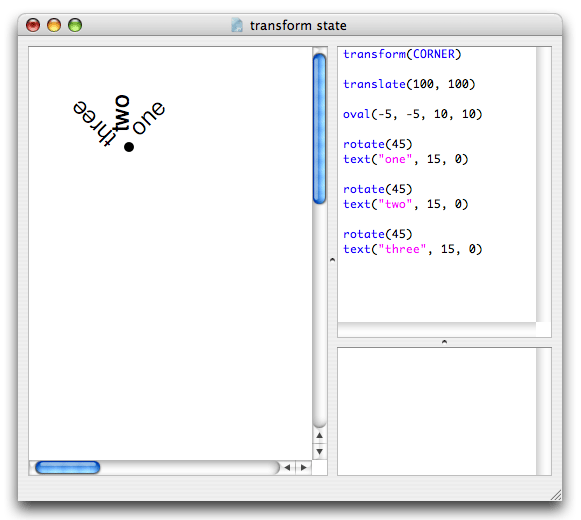
In the example below, we move the origin point to x=100 and y=100 and have three pieces of text rotate around it. Without the corner mode transform, they would rotate around their own center and it would be a lot more difficult to position them.
The reset() command will reset all transformations from that point onward in your script.
State in a state?
Two other transformation commands are push() and pop(). You can use these to create a state in a state. They sort of do what brackets do in language: in the middle of the sentence, they can sidetrack, then go back to the main sentence. Once you call the push() command, all subsequent translate(), rotate(), scale() and skew() commands are valid until you call pop() in your script. Then the transformation state reverts to how things where before push(). This way you can transform groups of elements that need to stay together.
Color and text commands are not affected by push() and pop().
Here's a short example. Note that the last rectangle isn't rotated. That's because the rotation happens between the push and pop "brackets".
rect(20, 20, 40, 40)
push()
rotate(45)
rect(120, 20, 40, 40)
pop()
rect(220, 20, 40, 40)
Again using our analogy and planets, the push() and pop() command are a bit like a moon orbiting around a planet. Each plant is orbiting around a certain origin point (the sun), but regardless of where this is, the moon is always orbiting around the planet. A planet is a local origin point for the moon.
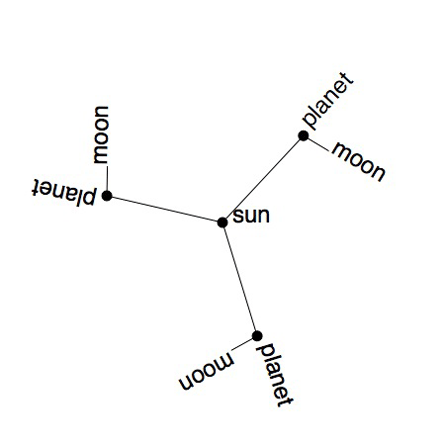
size(450, 450)
speed(30)

def draw():

    stroke(0)
    transform(CORNER)

    # This is the starting origin point,
    # where we place the sun.
    translate(225, 225)
    oval(-5, -5, 10, 10)
    text("sun", 10, 0)

    for i in range(3):

        # Each planet acts as a local origin for the orbitting moon.
        # Comment out the push() and pop() and see what happens.
        push()

        # This is a line with a length of 120,
        # that starts at the sun and has an angle of i * 120.
        rotate(FRAME+i*120)
        line(0, 0, 120, 0)

        # Move the origin to the end of the line.
        translate(120, 0)
        oval(-5, -5, 10, 10)
        text("planet", 10, 0)

        # Keep rotating around the local planet.
        rotate(FRAME*6)
        line(0, 0, 30, 0)
        text("moon", 32, 0)

        # Move the origin back to the sun.
        pop()
Breaking the state
If necessary, you can break away from the state and colorize and transform elements individually. Each of the primitive commands (line(), rect(), oval(), star(), arrow()), beginpath(), drawpath() and text() have three optional parameters: fill, stroke and strokewidth.
So you could do:
rect(20, 20, 100, 100, fill=(1, 0, 0))
which is the same as
r = rect(20, 20, 100, 100)
r.fill = color(1, 0, 0)
and instantly draws a red rectangle regardless of the current state fill color.
Likewise you could also:
r.translate(x, y=None)
r.rotate(degrees=0, radians=0)
r.scale(x, y=None)
r.skew(x, y=None)
The transformations are then applied only to rectangle r.
With the text() command you can also use the state-less font and fontsize parameters:
text("hello", 20, 20, font="Helvetica")